


No matter if you are a designer, a developer, or just an ordinary internet user, at least once in your life you must have come across a website that used some 3D elements. Or maybe even offered a full-fledged 3D experience on its own! In this article we will dive together into the world of 3D web graphics and take the first step towards making you fall in love with them.
In this tutorial, we will use a library called Three.js and we’ll start with a simple “hello world” of it.
So, in this Three.js tutorial, you’ll:
- learn what the Three.js library is,
- see how Three.js impacts websites,
- get a step-by-step guide on how to code and display a simple 3D graphic – from the basic configuration to the final animation.
But first…
What is Three.js and how it affects modern websites?
Three.js, is a high-level JavaScript library and API that helps developers create and display animated, GPU-accelerated 3D computer graphics in the web browser using WebGL. The library makes it easier to do that than by using a low-level API of WebGL which would require extensive knowledge. And with the use of Three.js we can develop some amazing projects and do almost anything you can imagine.
Three.js was released on GitHub in 2010 by Ricardo Cabello (mr.doob). It opens new possibilities for developers as well as designers and really changes the way we see web apps. It is used increasingly in computer graphics and web development and it continues to grow in popularity, perhaps because it allows you to extend your website’s user experience with some previously unavailable features. Now you can not only add single eye-catching 3D elements to your website, but you can also create a whole film-like experience that compels users to save your page in their bookmarks and come back when they need to see something truly amazing.
But 3D is not only about appearances. Of course, it catches the eye, but it also helps design more entertaining user interactions, visualize data, find new ways to use an app, or just make it easier to handle in general.
If you want to learn more about tech evolution and how it allowed developers to come up with amazing web experiences, check out my previous article – Three.js – how tech evolution let us create 3D graphics on the web.
A few more words before we start
Before we can set out to do everything that we can imagine, we must (sadly) start with learning this technology. I admit: it’s really, really hard to learn everything that it has to offer. But the satisfaction when you use it to make something is just enormous.
One thing that I can recommend to you to make things easier as you go through this tutorial, is that you should have Three.js documentation open and look at it while we discuss individual topics. It is important, as we can only learn some basic things from this article, so if you want to learn more, you should look at the documentation on your own later.
Basic configuration
We’ll begin our tutorial by creating a simple project structure, installing necessary packages, and starting the development server. For what we want to achieve, we will need just the basic files, so in your project folder create three files: index.html, style.css, and index.js
Then, we need to install the Three.js library using NPM (or Yarn if you prefer). In the console we need to use the following command:
npm install three
Lastly, we need to start the development server to see all the changes that we’re doing in the browser. To make it quick I’ll use a bundler called Parcel. To run the index.html file with Parcel we need to use the following command:
npx parcel index.html
That way we should have a basic development server with hot reloading started. We can see our work in a browser using the URL provided by Parcel in the terminal. Of course, right now we can’t see anything as we don’t have anything in our files, so let’s change that.
Every journey starts with HTML
First we need to create basic HTML structure in index.html file (you can copy and paste it or use Emmet extension to do it) and link CSS and JS files in it. For Parcel to bundle our code, we need to add type=”module” to the script tag. Then, to work with Three.js, we need one more thing in our HTML – the canvas element.
Canvas is used for drawing performant graphics in the web browser using Javascript, as it has its own context and API that we can use. While working with Three.js the canvas element is used by a renderer (I’ll explain what it is later in the article) to display our final scene in the browser. So its name is very accurate, as we (or to be more precise – Three.js) are drawing the scene on a canvas, just like a painter.
To use a canvas we just need to add html canvas element in our HTML file. We should also add an id for it to be able to query it in a JavaScript file and to style it. Our final index.html should look like this:
Let’s make it pretty (kind of) with CSS
Now that we have our HTML file, we can add some styling. Right now our canvas has a fixed width and height and we want it to be full screen and fixed to the browser window. We can also remove all scrolling behavior by setting body overflow to hidden.
We will also remove margins and paddings from all elements, so that the canvas element doesn’t have any blank spaces between it and the browser window. In the end the CSS file should look like this:
The fun begins with JavaScript
That’s it, now we can finally start with the JavaScript. In the index.js file we need to first import Three library using the following line:
Next we need to make our canvas element available, so let’s use querySelector to get it from our HTML:
Step 1: Scene – box for everything else
Alright, now we can make a scene! A scene is an object where all other elements exists. Everything that we see in the final render is usually contained in some scene, so it’s something like a root container for other things.
To better understand how Three.js works, we can think of our scene as if it were a movie plan. The scene object is our plan. On it, we can put objects which also exists in Three library – camera, lights, meshes (actors), and so on. We will go through all of it, but bear in mind that this comparison to a movie plan is pretty accurate and we are the directors in some way. Anyway, to create a scene we’ll use:
Now we can use our scene object to put other objects inside of it.
Step 2: Camera – our eyes in 3D world
Right now, we don’t know yet what is happening in the scene, because we can’t look inside of it. So first, we need to put in a camera that will work as our eyes inside the scene. In Three.js we have multiple cameras to choose from, but the most popular ones are:
- orthographic camera – used mostly for flat, 2D scenes, as it doesn’t take perspective into account,
- perspective camera – used for rendering 3D scenes, taking perspective into account – works almost like the human eye.
In our project we will use the latter, to produce a proper 3D experience.
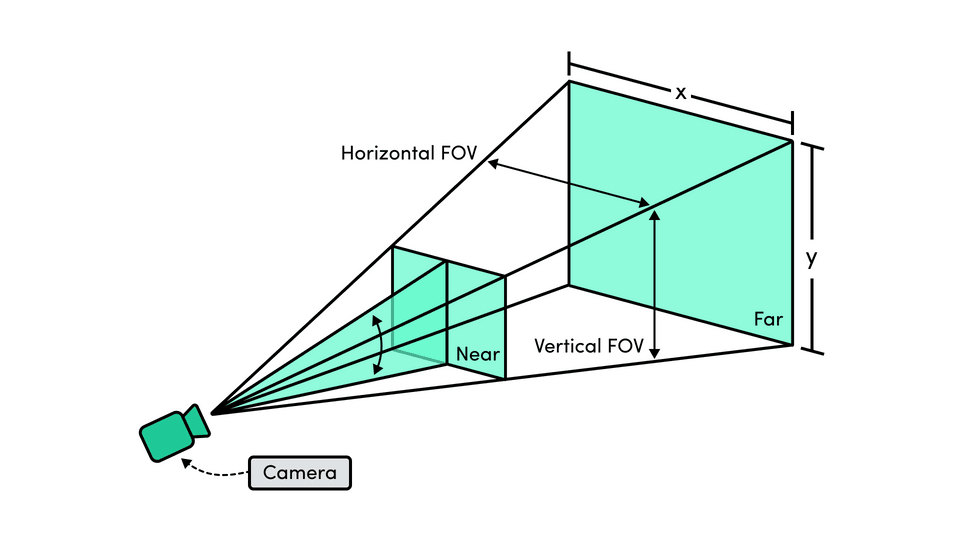
The perspective camera constructor takes 4 arguments, and it’s very important to know and understand all of them:
- FOV (field of view) – it’s the angle between the top and the bottom plane of camera frustum view,
- aspect ratio – ratio of the visible scene (typically the ratio of canvas width to canvas height),
- near – the distance from camera to the plane from which the camera „can see”,
- far – the distance from camera to the plane from which the camera „can’t see”.
All objects in the scene that are in the range from the near plane to the far plane will be visible in the final render, everything above far or below near won’t be rendered.
All of that is very well explained by this image:

So now, we’ll create our camera using the following parameters and then add it to the scene, as every object should be:
Step 3: Renderer – the brain of all operations
Once we have a camera in our scene, we can finally render it. For that, we’ll use an object called renderer. Its job is to analyze everything in the scene – positions of objects in relation to other objects, to the world coordinates, etc. – and display it on our canvas, taking all these properties into account. Let’s add it:
As a parameter we provided the object with our canvas element, so the renderer will know where to display our scene. We also set the anti alias property to true for the final objects to be smoother. Then we set its size, so it renders the scene on the whole canvas and we also set the pixel ratio, so that everything will be displayed properly even on screens with higher pixel density. We also changed the background color of the renderer to be a bit lighter than the default black.
Notice that we used a hexadecimal value for the color. It’s the recommended way to do it, but you can also use the Three library “Color” constructor to use other types of color values. Read about it in the documentation.
Now we need to use the render method of the renderer to display the scene. It takes two arguments: the scene which will be rendered, and the camera that will be used to render it. So basically, it’s like saying: “Hey renderer! Use the image of my scene from this camera and display it on the canvas.”
That’s it! We can now look in our browser and see… nothing? Yes, that’s our scene. It’s completely empty. But don’t worry, now we’ll add an actor.
Step 4: Box – so we can see something, at last
Our actor will be a box. It is created from a mesh object using two other objects – geometry and material. We can use objects from Three library’s geometries and materials or make our own with 3D graphics software like Blender. The latter are generally more complicated, so we are not able to make them from native Three.js objects.
Geometry – shape it
Geometry is like the skeleton, the shape of an object (created from vertices, edges, and faces). We can use geometries included in the Three.js library (plane, box, sphere, and others) or make them on our own. You can see all geometries offered by Three.js in its documentation, where you can find a sandbox for every geometry, control all parameters, and see how they change the shape of the geometry, so I highly recommend you try it.
Material – dress it up
The other element that builds the mesh is material. It’s like the skin of a geometry and it determines how the object will look in the scene, how it will interact with the lights, and so on. Materials have many parameters and every one of them is different, so you can check them in the documentation. With materials we can use textures, height maps, normal maps, and many others.
Mesh – let’s put it together
As our object we will use the BoxGeometry, which as you can see in the documentation, takes six arguments: width, height, depth, and the number of segments for width, height, and depth. We’ll use only the first three of them and leave the rest as defaults.
We will also need a material. As some materials are physically accurate and require a source of light to be seen, for our example right now we’ll use MeshBasicMaterial, as it can be seen without the light in the scene. Lastly, we’ll create a mesh from these two objects and add it to the scene. It’s very important that you add those lines before instantiating the renderer, so it can take this mesh into account while rendering:
What’s with those units?
Before we can continue, you may be concerned about the values that we used in the box geometry constructor. In Three.js as units we use… units. For us that can be meters, kilometers, pixels, or some other values, but for Three.js they are just some units in a 3D space. So a good way to handle them is to establish some basic unit and make everything relative to it.
3D world coordinates – don’t let them confuse you
Ok, we have our actor in the scene, but the scene is still empty. What is happening here? The answer is simple. Let’s remember that we are in a 3D space with x, y, and z axis, so it looks something like this:

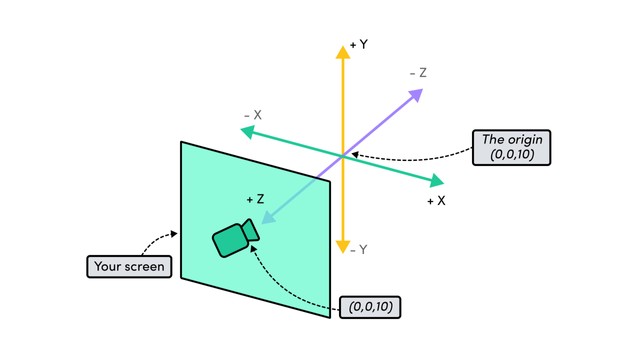
By default, every element added to the scene has the following coordinates: x = 0, y = 0, and z = 0. Right now our camera and our object are in the same place in a scene, so we are “filming” our scene from inside of our cube!
The conclusion is simple, we need to move something, either the camera or the object. We’ll move the camera on Z axis, so it’s away from the cube. Add this line below the camera constructor and above adding the camera to the scene:
Yay! We have our object! But it’s flat…? That’s because we are now facing it. Let’s move the camera on the other axis and make it look at the point where the cube is, so the center of the scene (0,0,0). Change the previously written line of code to the following:
Yeah, that’s the proper way to see a cube! Finally we can see something that looks like it’s in 3D! Isn’t it cool? Let’s move on, next step – lights.
Step 5: Lights – light up your scene
There are a lot of lights in Three.js and you can refer to the documentation to learn all about them. We add them to the scene like any other objects, but their configuration is different, so it’s really a matter of experimenting with their properties.
For our example we will use two lights:
- ambient light – a light that illuminates objects evenly from all sides,
- point light – we need to position it somewhere in the 3D space and it will illuminate all directions from this point, acting like a bulb.
To use lights, first we’ll need to change the material of the object to one that reacts with the light, so let’s change it to a standard material:
Then we can add lights. Just like with the mesh you need to do it before instantiating the renderer:
Looks good, doesn’t it? But it can be even better! Let’s spin it!
It’s animation time
Right now, we’re rendering our scene only once – when we use the render method of a renderer. We’d like to make our cube spin, so we must render our scene multiple times, every time adding a value to the rotation of the cube. Ideally we would like to render our scene about 60 times per second and each time spin it a little to make a smooth animation.
requestAnimationFrame to the rescue
Luckily, we have a function that was created precisely for this and it’s available in the window object. It’s called requestAnimationFrame and it can be used to call an animation function, ideally in 60 frames per second (generally matching the display refresh rate). This function as an argument takes callback function that should be called before the next repaint.
It’s spinning!
OK, so to use it we’ll create a function called animate that will call the render method and will be called recursively using requestAnimationFrame. That way we will call the render method multiple times in a second. Also, in every frame (every time the function is called) we’ll change the rotation of the cube a little, so at the end we will have a smooth, rotating cube. Let’s do this, change renderer.render(scene, camera) line to the following:
And we’re done! Watch the animation spin.
If you have any problems with your cube you can find the full code here: https://github.com/pati-gorrion/threejs-basics
Don’t stop now. Go with the 3D flow!
Actually, we are not done yet. There’s plenty to do in our Three.js tutorial! You can try to add orbit controls to the scene, to allow you to control the camera with your mouse, or add some resizing to the window. You can also add some other objects to the scene, so our box is not alone, or just try to change some properties and watch how it changes the final render. Maybe try some other materials or lights? Just saying.
The scene is yours, limited only by your imagination. You can find everything you need in Three.js documentation and I really recommend you to check it out!
All in all
As you can see from this easy tutorial, when it comes to 3D graphics and web development, even a very basic example with just a few lines can give you a lot of fun (or at least I hope it did!). And from there, you can experiment with everything and watch even cooler things happen.
Every journey starts with a small step, so don’t give up and try something creative. The web is full of examples, you just need to find them. Of course, it’ll be hard in the beginning, but it’ll be very satisfying when you finally get it, you’ll see. And most importantly, it’ll let you build beautiful websites and apps to please the eyes of the others.
This article was updated in August 2024 for comprehensiveness.
Have a project in mind?
Let’s meet - book a free consultation and we’ll get back to you within 24 hrs.
A full stack developer with a special focus on frontend and mobile development. Lover of modern and innovative design, including immersive 3D elements. In a spare time, you can find him strumming on a guitar, listening to music, or diving into a good book.


